Tuesday, January 26, 2016

Practice Report

I got to work directly with my cadet for the first time in awhile (schedules just haven't lined up).
Her ankle continues to be a problem, so we did some low intensity drilling. Handshots and opposition. She had brought someone from the Bergental practice to get authorized, so I watched the two of the drill for a little bit. It is very interesting to see the student of your student fight for the first time.

My first fight was a derp fest, but I manged to pull myself together. I tried to stick with Fabris for the most part - and my back is not upset at me, so I call that a win. My feet were not as under me as I would have liked, but that's just footwork drills.
I fought a left hander and tried to stick to Fabris, and he did find it challenging. I finally tried expanding my guard range in that fight, and I think it worked well.
Normally I hang in something like Fabris's plate 60.
Dagger out, sword low. Tips together.
Because I was fighting a lefty, my dagger was over much further than it would normally be - starting pre crossed instead of with the tips together. This was working ok, but was far from ideal (open left side, tangling my weapons). So I tried changing up the angle of my sword.
I realize that the guard I tried is losing in this plate. 
I lifted my sword into prima, keeping the tips together., which made me feel much more confident should my opponent attempt to go wide around my right side. It also naturally shifted the connection of my weapons a little bit to the left. I think it also helped that my opponent didn't really know what to do with it - who hangs out in prima, after all?
I will have to experiment more, of course.
The downside of the new guard is that I lose a lot of fine motion.

I also fought a relatively new fencer who has recently started into Destreza, and last time we fought he wrecked me in a number of ways that should not have happened. I have been practicing against Destreza, and also working on my patience (which fades pretty much the moment I stop thinking about it). Things went better this time, although the narrowing/transporting motion that I am trying to pick up is still not working in combat.

Monday, January 25, 2016

Embroidered Book Cover - The Embroidering Part 4

The silver fill is done! Need to fill four gold flowers, add some decorations, and clean things up. I may manage to actually finish this on time!

Thursday, January 21, 2016

Embroidered Book Cover - The Embroidering Part 3

I have started working with check purl. There are a number of small bits strewn around my room now that I will only ever find with my feet.
The idea of randomly putting down the bits of purl is hard for my brain to be ok with, but I think it's working out.
Hard to take a good picture of, though.
I decided it was worth showing what the size of this piece is. That's a normal sized thimble.

Wednesday, January 20, 2016

Device Pin Project Part 7

In which there are rust problems and horse problems.


Azure, three roundels Or each charged with a triskelion of spirals azure.
Here we have the rust problems. This was made at Gulf Wars, where it was quite humid. Both pins I worked on there got rust spots on them. It adds character, right?

Purpure, a unicorn rampant tail towed argent crined and gorged with a collar and chain Or, a bordure gyronny of eight vert and argent.
Horse problems part one. The tail and the chains and the border!

Quarterly gules and argent, a stag and a horse combatant sable.
Horse problems part two, compounded by stag problems. These two are lucky I like them.

And in case you've forgotten the size of these...

Tuesday, January 19, 2016

Embroidered Book Cover - The Embroidering Part 2

After I finished removing the paper from the book cover, I found a sad thing.

How did that even happen?
I replaced the whole curve, and hid the ends under the overlap and at the end of the leaf. The leaf shrank in the process, but at least it's one piece..

So as of the 12th, it was fixed and ready for fun things. 

I didn't work on it too much for the rest of the week, but I got a fair amount done over the weekend, including at 12th Night. I'm using bullion to fill the petals. It was probably purl originally, but I have a lot more bullion and it's a pretty similar thread. 
It is far less painful than using passing thread for fills (like I did on the gloves). Plunging threads is the worst. Wire for everything!


Monday, January 18, 2016

Order of the Silver Brooch

At 12th Night this weekend I watched several friends get recognized for a variety of wonderful things. What I was not expecting, even a little bit, was to be recognized as a premiere of the new A&S award.

I received a gorgeous (and documented!) Champlevé enamel medallion as well as an amazing actual brooch, both silver!
My cadet sisters are wonderful.

I also received a an amazing scroll. Sadly, it wasn't quite done. But it was gorgeous, and has a poem in an Italian style with copious fencing metaphors...and I can't wait to see it again.
Lavina Attewode caught it in court.
Thank you to everyone who was part of this.
And I suppose this means I have to keep doing this now, doesn't it?

MoD Gloves - Finished Product

After a many month saga - starting to plan the things in March of 2015, and then embroidering like mad until Donovan was given his peerage on May 2. Including doing nothing on the day of except sit in front of his vigil tent attaching the cuff to the glove.

Note it was singular. As the day drew close I started concentrating on only one glove, since only one was needed.

When that glove went out and was thrown down (onto a pillow, thanks your majesty) it still wasn't done. But it was done enough. But definitely not enough spangles.


And then I took a break. I was maybe, just maybe, a little tired of looking at these.

But little by little over the intervening months I have finished up the second glove's embroidery, attached it to its cuff, and then filled out the spangles on both of them.

The last spangle was sewn on on 1/16/16 on the way to 12th Night! I entered them into the populace A&S competition, and got a fair number of votes (although nowhere near the people who tied for first - and they totally deserved it!)


Of course, as I was sewing on that last spangle I noticed that I had completely missed outlining one of the small leaves. It was suggested that I come up with a Deep Reason for it.

I definitely need to stop looking at these. All I see is faults!

Tuesday, January 12, 2016

Practice Report

Post holidays and sickness! What is even a sword?

 I actually felt ok. My Fabris footwork is the main thing that suffered from my lack of practice over the last couple weeks. I did a lot of forcing myself to stick to Fabris (or opposition) even when it wasn't working. Only once did I slip into all my old ways to kill someone, just to remind myself that I can (and I admit that was satisfying).

I really need to do my homework and expand my Fabris guard horizons.

 I had to remind myself to cross instead of lunge a lot. Crossing gives me greater distance than just a lunge and allows me to maintain opposition more effectively. But lunges and redoubles still reign supreme in my muscle memory.

My biggest problem of the night was Destreza. Specifically, Destreza from someone much taller than me while we both have single. If he attacked first, I was fine, but I had a lot of trouble initiating anything in a safe way. I was trying to do opposition (often in Prima, occasionally by going all the way over the top of his sword) but even when I managed to gain his blade he was often able to angle or disengage out of it, and I didn't have as fast a response because of how high I was.
If I had a dagger I would have just grabbed his sword with that and it would have been over, but I feel far less comfortable doing that with my hand for a variety of reasons.
I know the theory of a lot of things I could have been doing - I just need to throw myself at the tall Destreza fighters in my area over the next couple practices and work things out.

Monday, January 11, 2016

Embroidered Book Cover - The Embroidering, part 1

Once the planning stages were done it was time to embroider. But first I wanted to make sure I remembered how to embroider on velvet - and also try out these new materials I had.
The way I learned to embroider on velvet involved tacking a piece of parchment paper on top of the fabric, and sewing right through it. In this case I also tacked the velvet onto stabilizer that was in a frame. This let me make sure the fabric was taught without crushing the precious velvet.

Test run
For my practice run I just copied one of the roses off of the full design. I used passing thread for the lines, and bullion for the fill. The veins are also passing thread, but this thread also has red silk wrapped around the core. I originally intended to fill each petal, but I decided it was better to get on with the main event.
I stretched more stabilizer over a scroll frame, and tacked down the velvet. I then traced the full pattern onto parchment paper and tacked that down. I was careful throughout to leave enough excess to be able to actually turn all this into the cover later.
Halfway through the process I decided that covering a smaller book and using only the inside part of the pattern was probably a good idea for my sanity. I'll use that sweet border some other time.


And then began the couching.
When I asked for feedback on the gloves, a major point was that usually two thread were couched side by side. Of course, looking at my pattern, that is only the case with the main lines. The leaves are a continuation of the main line, but using only on thread, creating the crossover that you can hopefully see below.
I can already see how two threads (and better materials) help make things less wavy.


 Here I have completed all the main lines, with relatively few mistakes. I forgot to do one leaf as I went by, so it doesn't look as smooth.


And as of the end of this weekend I've finished all the lines and have begun to remove the paper!
I thought the lines would be the most painful part, but the paper removal is definitely winning.
The silver passing thread I used for the corner roses is wrapped more tightly and is much more wire like than the gold thread was. I can see this being amazing for longer lines, but for the tiny flowers it was kind of a pain.

Thursday, January 7, 2016

Embroidered Book Cover - The Planning

I had decided when the gloves were (mostly) done, that I should probably actually enter an A&S competition with them. The first one that I'll be able to make it to is King's and Queen's Arts and Sciences. Go big or go home, I suppose.

Of course, this year they require a "body of work" to enter. And while I have plenty of embroidery, I have only one thing that is vaguely documented. And so I needed to come up with something that I wanted to do, could document, and would work with the gloves.

Maybe I could use this as an excuse to try some actual metal thread? (says my brain which likes to overwork me) Embroidered book covers are pretty fantastic after all.

In my search I discovered a page from the West Kingdom that helped immensely. It also gave me the design I decided to work with.
 A little more poking around and I found a book called English Embroidered Bookbindings by Cyril Davenport on Gutenburg. And in that book is this book!

"There is in the British Museum a copy of Orationis Dominicæ Explicatio, per Lambertum Danæum, printed at Geneva in 1583, which belonged to Queen Elizabeth. It is bound in black velvet, measures 6¾ by 4¼ inches, and is ornamented most tastefully, each side having an arabesque border in gold cord and silver guimp, enclosing a panel with a design of white and red roses, with stems and leaves worked in gold cord and silver guimp with a trifle of coloured silk on the red roses and on the small leaves showing between the petals. On the front edge are the remains of red and gold ties. The design of this charming little book is excellent, and the colour of it when new must have been very effective. The design is the same on both sides. The back is in bad condition, and is panelled with arabesques in gold and silver cord."

Some of the details here made complete sense to me, although I have a hard time seeing the red and white silk they mentioned.
I had no idea what guimp was, but people more learned than I in Athena's Thimble suggested that it may be what we now call Torsade, and was almost certainly some kind of twisted cord that was couched through the middle.

By this point in my research I had acquired a variety of threads (although not exactly what was used in the original), some black velvet, and a book to cover.  I was prepared to dive in.

Tuesday, January 5, 2016

Mod Gloves - The Embroidering

This is part 2 of the glove extravaganza. Part 1 can be found here.

The is the exciting part! To me, anyway.

The inspiration gloves were white leather, with red silk and gold thread. It looks like there could maybe be some silver in there too, but it's hard to tell whether that just because it's old or not.

I knew that Donovan wanted black gloves, preferred silver to gold, and that his outfit would be green. So I adjusted the colors to reflect that.

I started with a nice thick piece of black linen, big enough to work on both cuffs at once. I knew that if I did them one at a time then he would only ever get one glove. The large scroll frame I have was just big enough to work.

Transferring the pattern to the fabric was a project in itself. I didn't feel comfortable freehanding the pattern, and thick black fabric and light boxes don't really get along. And besides all of that, any normal pen wasn't going to show up anyway. I ended up using a combination of chalk and carbon transfer sheets to get the pattern on there, and then stitched around eeeeverything with running stitch, because the chalk was never going to stay long enough.


Then began the silk embroidery. This, at least, was nothing particularly new. I chose green instead of red to go with his outfit, and because he's a fan of the color. I also decided to have the larger motifs needle painted...mostly because I really like how needle painting looks.

I used Eterna flat silk, which is a pain to work with but so very shiny. I outlines each flower-thing with split stitch with the darker green, and the filled it in with long and short stitches. For the needle painted ones, I did last row or two in a light green, still with long and short stitch.


For the OGR and OSR symbols I decided to applique felt for the blue areas instead of trying to fill it in with stitches. This was mostly because filling in the entire circle for the OSR seemed like a bad idea, and I wanted to make sure they matched. So I cut out circles and tiger heads, two of each, and appliqued them down with tiny stitches.

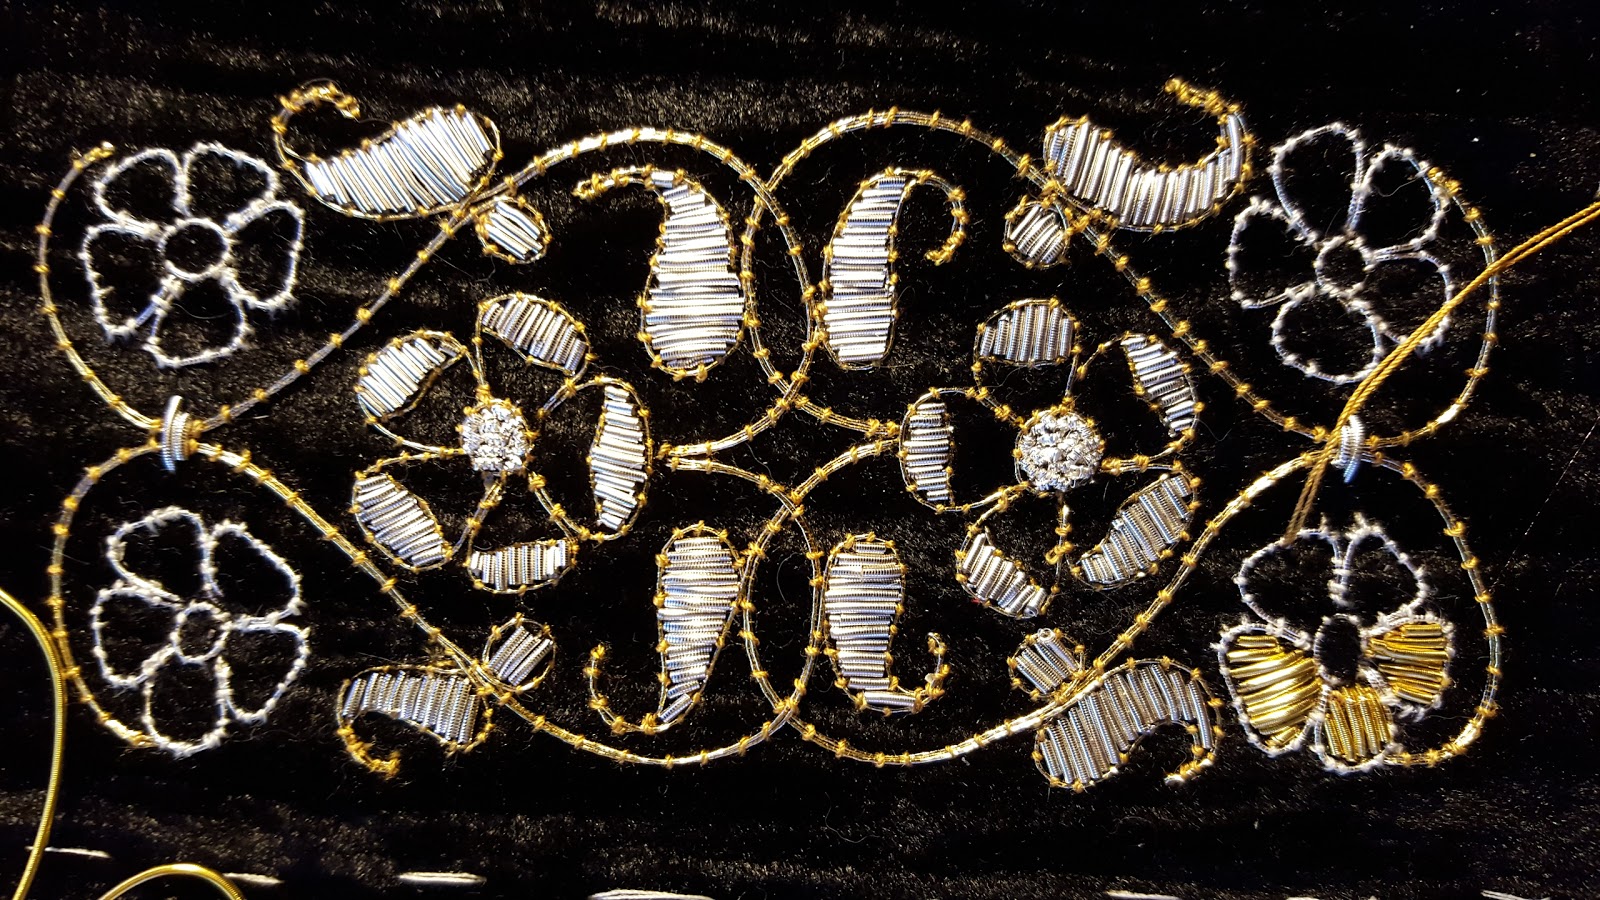
Now for some goldwork.
Due to the time contraints I had, and the fact that I felt like I could have ruined this at any time, I did not splurge on new materials for the goldwork. I had some jap gold (and jap silver) in a somewhat thick size (check for the size?), and did all of the goldwork using those threads. These threads were perfectly fine for the lines - maybe a little bit too bold, and difficult for turning corners, but perfectly serviceable. Where the threads fell down was on all of the filled areas. I'm pretty sure that the original gloves used chips of check purl to do the filling, but the Japanese thread of course needed to be plunged..and plunging centimeter long bits of metallic thread is not a thing I suggest to anyone. Especially a wrapped thread that will start to fall apart.

I realized quickly that due to time and the previously mentioned corner turning problems, that doing all the little leaves the design wasn't going to work. So most of those got dropped early on.

One problem that I didn't foresee was that the thick thread absolutely could not be plunged through the dense felt I used for the badges.This was mostly a problem on the Silver Rapier badge, and resulted in a lot of creative bending and end covering. I think it worked out ok, but I will never make that particular mistake again.


I am very happy with some of the couching work I did and very unhappy with other parts. Things that looked ok on the frame got wobbly once the tension was off. A lot of the problems came from rushing - I didn't put my stitches close enough together, I didn't always secure the stitches as tightly at the ends as I should have.